Dominic grammaticoStudent at CSI CategoriesArchives
June 2019
Video Credit:https://www.youtube.com/watch?v=nkvHAje4RtY

|
Back to Blog
The project went really well. The most successful part would probably be how fun people said it was. The majority of people talked about the cards especially. If we had more time, I i would make the board neater overall and maybe flatten the board itself out a little bit. The group worked together really well, and we kept on time and were in a good place for the whole duration of the project. Everyone pulled their own weight, which is very good. The part that was most creative/successful was the cards. They printed nicely and were colorful, neat, laminated, and high quality. I am satisfied with what we did with them. What I learned from this is that making higher quality work and not wasting time makes a better product and makes the player happier. This is the final reflections/thoughts of the project.
0 Comments
Back to Blog
Post 2: Color Story6/3/2019 The name of our board game is called "Seize the Sea". This goes along with our ocean theme. Here is the color swatch that I made to go with our theme and board game:   My inspiration for this was images of the Odyssey book cover, as they were very colorful. The colors are meant to be aesthetically pleasing to go with our game. Another quote that inspired the colors I chose was: "We are Achaians coming from Troy, beaten off our true course by winds from every direction across the great gulf of the open sea, making for home, by the wrong way, on the wrong courses. So we have come. So it has pleased Zeus to arrange it." This quote I liked because it fit with the theme of our game.
Back to Blog
Game Project Phase 1: Ideate6/3/2019 During the Ideate/Design phase, we talked about many ideas and premises for the game. We thought of basing it off multiple types of board games, but we settled on a "Sorry" type board game. The idea seemed pretty successful since the game was enjoyed by many people and it was a simple concept. We still must fine-tune all of the details that make the game fun however, and this will take some time. This was how the Ideate phase of the project went. 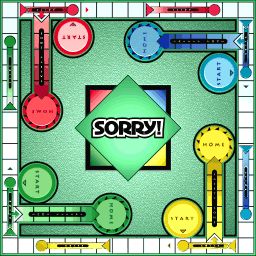
Back to Blog
Blog 3: Feedback6/3/2019 The feedback we got for the game was reasonable and helped us decide what to do next. We did not expect that the color palette would not be well received. A positive piece of feedback that we got was that the cards made the game fun and that they were relatively easy to understand. The most helpful feedback regarded the word choice on the cards, and that it should be more simple so everyone could get it and have fun. We are making many modifications to the game, such as reprinting the cards and going over the board to add more color.
Back to Blog
Furniture Project5/29/2019 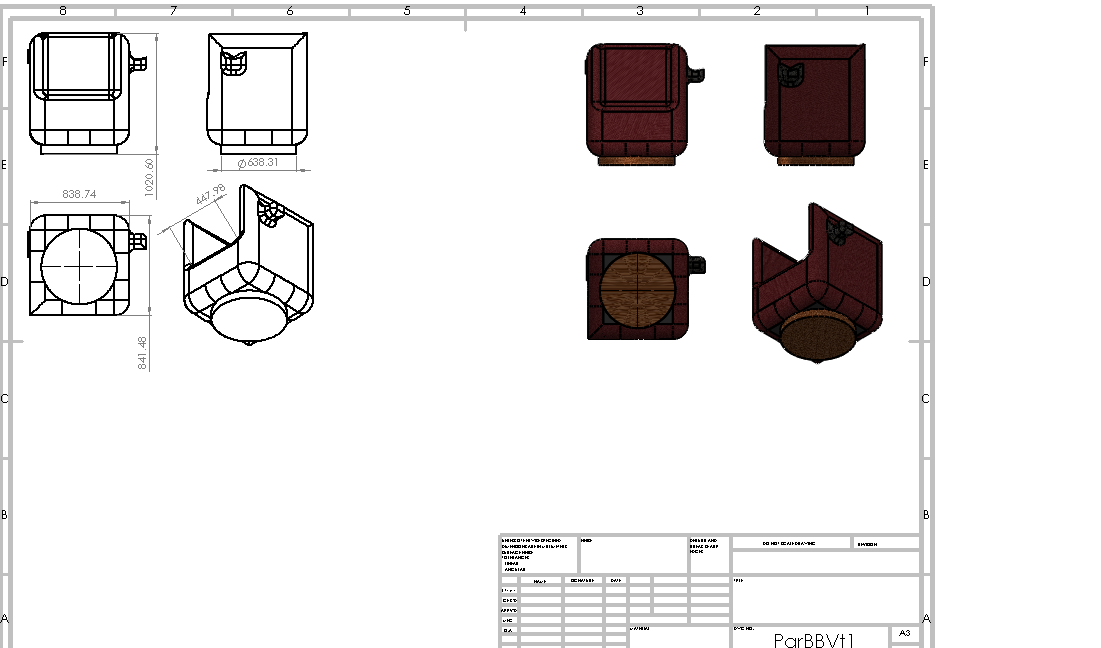 This is a 3D blueprint of the chair I made in Solidworks on the 29th.
Back to Blog
Kite Project Part 6: Creativity11/6/2018 Our kite was not particularly unique in any special way, but we all put time and effort in the production of it. Some of the Elements of Art that were in mind for me were Form and Texture. Form because the kite is shaped in a way that allows air to funnel through it, creating lift. Texture because we used a material that was resistant to the elements so our kite would remain unbroken. Some engineering features that were included were that we tied the string the center of the cross at the end of the box kite, so that it pulled equally on all sides, ensuring stability. Some creative and cosmetic features that we put on the kite were pictures printed from online and drawings on the kite. In conclusion, the kite project was a very good experience.
Back to Blog
Kite Project Part 5: Reflect11/6/2018 This is the reflection part of the project, where I take time to reflect and think about my experience. The final fly experience was decent, seeing the few kites fly in the air. Our kite, unfortunately, did not fly. We tried to fit some final adjustments and finishing touches before we flew it, but unfortunately, it didn't work. I think my group worked relatively effective during the project. What was most successful about our kite was that it flew low for a short period of time. In retrospect, we could have made the design a little more intricate and maybe it would have flown better. If I had more time I would repair the kite and improve it so that it would fly sufficiently. My biggest contribution to the project is choosing the box kite type, (It was either that or a delta kite) and helping my group get everything done. 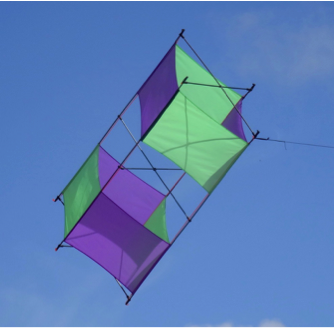 (A picture of a box kite.)
Back to Blog
Kite Project Part 4: Test/Feedback11/6/2018 During the test part of the project, we got a lot of feedback on how to improve our kite. Our first test flight went poorly as far as flying goes. Some issues that the kite had were: 1. It didn't fly. 2. It wasn't symmetrical. 3. It wasn't stable. 4. It was damaged during testing. We got some helpful feedback on how to improve the design and kite. Some feedback that we had gotten were to add more support rods to the kite, and improve the symmetry of the components on the kite. We did not find any research that was necessarily conclusive, but we did find some that helped improve the design of the kite. Some things that need to be resolved before the due date is the overall functionality of the kite. The kite can only fly a few feet above the ground at high wind speeds.  (A diagram of the forces acting on a box kite.) From NASA.
Back to Blog
Kite Project Part 3: Prototype11/6/2018 For this part of the kite project, we are building a prototype for our kite. So far, we have made multiple small scale prototypes to get an idea of what we want for our kite. These prototypes so far have not been helpful in planning the design for the kite. We constructed our kite using square wooden dowels to form a box kite. We then used hot glue and tape to put together the rods of the kite to finish the frame of the kite. After that, we finished by taping it and using hot glue to complete the model. We had encountered an obstacle while building the kite, when we had realized that the material we were using wasn't strong enough to support our kite in the air. We overcame this by simply changing the material. All that we need to do before our test flight is make sure the kite doesn't have any broken or damaged parts. 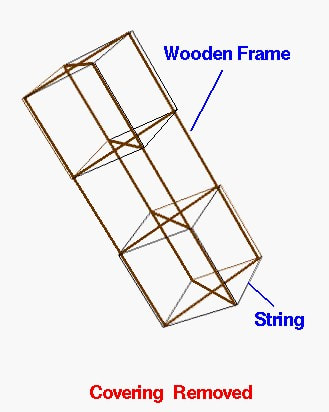 (A diagram of a box kite frame.) From NASA.
Back to Blog
Kite Project Part 1: Empathy11/6/2018 During the empathy part, i learned some valuable information about the types of kites and their uses that can critically help our group. I looked at multiple sources online to find this out. My group will most likely use the information to choose a kite design and help produce it using the kite types as a baseline. I will however need to continue to research the different types of kites and how they fly, and also more general information on it.  (A diagram that shows some of the popular types of kites) From NASA.
|
 RSS Feed
